|
Most antique saddles are worn or damaged, and the dilemma
facing the collector and saddlemaker is to repair them or
not. Museum curators with little knowledge of leather
will wring their hands and say you should do nothing to
old saddles. At the other end of the spectrum are
collectors who recognize that old saddles are functional
art, and they want them restored to their original
functionality.
I draw an
analogy to collectors of antique automobiles. The old
cars were built to run down the road and collectors take
great pains to restore them to an operating condition.
You don't see them showing off rusting hulks in their
barns. I personally view antique saddles in much the same
way, but I also recognize that some saddles are best left
as "lookers" that will be best preserved if
they are not restored to ridable condition. I provide my
clients with the following guidelines to determine what
will be the best decision for a particular saddle:-
1.
Are you going to display the saddle or ride it?
The bar patterns in late 19th and early 20th century
saddles are not going to fit most contemporary horses,
yet I have clients who have horses that these old saddles
can be used on. If the saddle is going to be ridden,
repair of the tree needs to be considered.
2.
Is the saddle in a condition that safe repairs can be
made?
On some saddles, leather parts may be so deteriorated
that attempting to repair them would only cause further
damage. Duplication of parts can be considered, but my
personal philosophy is to retain as much of the original
work as possible.
3.
If the repair can be made, how will it affect the value
of the saddle?
In this area, the skill of the saddlemaker and knowledge
of antique saddlemaking techniques become very important.
The value of an antique saddle can be lost with
incompetence, careless work and repair work that is
totally out of character for the period of the saddle.
Antique saddles have been ruined by machine stitching,
and you should be prepared to bear the cost of fine hand
stitching with linen thread. You can choose between
saddlemakers who specialize in restoration of antique
saddles or you can take your collectible to the
saddlemaker who can "fix up any old saddle".
Any part on
an antique saddle can be repaired or replaced. Some
damaged and broken trees can be repaired and recovered
with rawhide, but in other trees, the old wood will not
withstand the stress of drying and shrinking rawhide. In
that case a duplicate tree can be made, and when a tree
is duplicated a bar pattern more compatible with today's
horses can be used if the saddle is going to be ridden.
On many antique saddles horn repairs have been neglected
until the leather, wood and rawhide are worn down to the
horn metal. Horns in this condition can often be rebuilt
without taking the tree out of the saddle.
Rigging
leathers may outwardly appear to be sound. Where leather
is in contact with rusted rigging hardware, rusted screws
or rusted nails, it will alter to a black powdery form of
rot. Needless to say, if it is stressed it could fail.
Early rigging rings and dees were hand forged iron, and
they were covered with leather to prevent this form of
rot from occurring on rigging straps and leathers. Most
styles of antique rigging hardware are available from
foundries, and authentic duplication of the original
rigging is seldom a problem.
Horn
leathers wear out, and recovering horns is a common
repair. On some saddles the swell cover may have to be
removed, but on some Sam Stagg rigged saddles only the
rigging may have to be removed. In recovering horns it is
important that the technique be appropriate for the
period, and in some case, such as F. A. Meanea saddles,
appropriate to the maker at a specific period in his
career. Nothing looks worse or detracts more from the
value of an antique saddle than a 1970's production shop
horn covering on a vintage 1880's saddle.
Ropes put a
lot of wear on swell covers and the leather cover may be
completely worn through to the tree. Front bindings can
be worn off and underlying leathers can be worn away.
Small holes in the swell cover have traditionally been
repaired with scalloped-edge patches and brass escutcheon
nails. Large holes and tears require replacement of the
swell cover. Front bindings can be replaced and
underlying leathers can be rebuilt. Rolled leather welts,
braided welts and laced seams on swell covers are also
repairable.
Cantle
bindings are typically worn through or torn, and they can
be replaced with new leather. The back cantle leather is
seldom damaged unless the cantle on the tree is broken.
If the repair of cantle leathers has been neglected over
the years, shrinkage of the seat, filler and back cantle
can make repair of these parts difficult.
Curled seat
and front jockeys can be conditioned and pressed flat.
Torn seat jockeys can be repaired with a patch on the
back side. Back jockeys or rear housings also can be
conditioned and pressed to remove curls. Lacing that
joined the rear jockeys can be replaced.
Broken
stirrup leathers can be repaired or replaced. If the
saddle is going to be ridden, the condition of the
stirrup leathers is a safety issue. Stirrup leathers
usually show most wear on the extensions below the fender
and on the end with the adjustment holes. New leather can
be spliced onto old leather, or the entire stirrup
leather may need to be replaced. If contemporary stirrup
leather buckles have been added to the saddle, you may
want to remove them for historical authenticity. Broken
laces for stirrup leathers can be replaced. Fenders that
are curled can be conditioned and pressed flat. Tears in
fenders are repaired with a patch on the back side.
Fenders
that are worn very thin can be rebuilt. Often with thin
fenders and those with several tears, it may be advisable
to line the fender rather than make multiple small area
repairs. If fenders are missing they should be replaced
with ones whose style and shape are appropriate for the
historical period and the original maker.
Broken and
missing stirrups can be replaced with unbound oak
stirrups or oak stirrups bound with brass or galvanized
metal. Curled tapaderos can be pressed, and broken
strings holding stirrups in place in the tap can be
replaced. Stirrup covers and treads that are worn out can
be replaced, as can broken stirrup bolts.
Relining
skirts on antique saddles is a common repair, and a job
that is often botched. It is an acceptable practice when
relining contemporary saddles to machine sew a new stitch
line just inside the old stitching. Trying to machine
stitch old leather in antique saddles using the old
stitch line or a new one can result in the leather
breaking along these lines of multiple perforations.
Therefore it is recommended that relined skirts be hand
sewn. I have observed saddles in collections where the
new woolskin was secured to the skirt with contact cement
or acrylic lining material was used. Obviously this is
less expensive, but it definitely detracts from the
saddle's authenticity. When the skirts are off the
saddle, they can be conditioned and pressed to remove
curls. They can also be patched and rebuilt as needed.
Broken
saddle strings and those chewed up by dogs and rodents
can be replaced. Missing buttons and broken rope straps
can be replaced. Missing latigo carriers can be replaced,
but every effort should be made to repair and retain
those with maker stamps. Latigos, halfbreeds, off
billets, flank billets and flank cinchas wear out and
break during the life of a saddle. Replacing them is a
must if the saddle will be ridden, and replacements do
not detract from the authenticity of displayed saddles.
Replacing
saddle parts that are decorated with floral carving,
basket stamping or geometric stamping are special cases.
Here the artistic ability of the saddlemaker doing the
restoration is paramount. Duplicating art work requires
studying the original maker's technique, and tools may
have to be made to do the job. To me this is fun, but to
other saddlemakers it isn't worth the bother.
Figure
1 shows a corner floral panel on a circa 1880-1890
F. A Meanea saddle carved in the Spanish Colonial
technique.
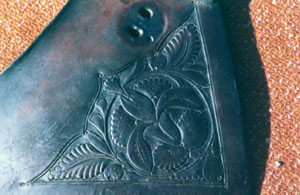 Fig 1. F. A. Meanea carved panel
The saddle
was purchased by a collector at a farm auction and it had
no fenders. My job was to build and carve a set of
fenders to match the saddle. Unlike other saddlemakers,
Meanea was always experimenting and trying something new
with his mechanics or his art work. It is not unusual to
find subtle differences in his art work on the near and
off sides of his saddles in inconspicuous areas. One can
infer that he was asking himself "how will this look
if I do it this way?".
After
studying all of the carved panels on this saddle, and
doing my best to get inside Meanea's head, the fender
design in Figure 2 was drawn and
executed by the author.
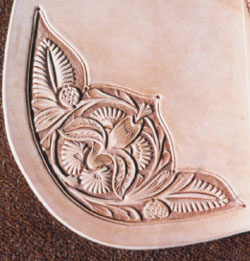 Fig 2. R. Sherer carved panel
New leather
parts are not going to be the same color as parts that
are old. Saddlemakers have to use their knowledge of
different oils, creams, dyes and finishes to match the
colors. Too often a collector will attempt this job on
his or her own when this is one job that is best left to
the professional. Improper use of some dyes can desiccate
and crack the grain of new as well as antique leathers.
Cleaning
and Conditioning
Any old saddle that is cleaned up is going to look better
than it did before. Knowledge about what constitutes
proper cleaning and conditioning of antique leathers is
the key to either increasing the value of a collectable
or rendering it worthless. It is important to understand
that different tanning processes produce different types
of leather which require different care. The vegetable or
bark tanned leather used in saddles, headstalls, cuffs
and spur straps is different from leather used to build
chaps, garments and boots. Each requires its own special
care and conditioning. Preserving leather depends upon
cleaning and conditioning the fibers to maintain their
integrity and flexibility. If leather is never cleaned
and conditioned, sunlight and the atmosphere take their
toll. This is especially true of leather in some museum
collections that has been illuminated under glass for
decades where one would assume that it is well protected.
All leather that does not receive periodic conditioning
is subject to dry rot. With dry rot, waxes and oils
migrate inward leaving the surface of the leather dry and
subject to cracking, and dry rot is accelerated in hot
dry atmospheres.
The best
time to clean and condition a saddle is when it has been
taken apart for repairs. At this time all of the surfaces
of leather parts are accessible. The one criticism I have
of saddles cleaned by collectors is that they seldom get
into the inaccessible areas. Cleaning removes dust, dirt,
salt and all manner of foreign material from the grain
and flesh sides of the leather.
Nineteenth
century saddlemakers used wax and resin finishes on
saddles, but many used shellac for high gloss finishes.
Shellac would wear off of parts like the seat jockeys and
fenders but would persist on parts that did not receive a
lot of wear. One important thing I have learned from
working with antique leathers is that it is very
important to remove old and built up finishes if you want
the conditioners to penetrate and do their job.
The
conditioning process is one of applying various saddle
soaps, waxes and oils in light coats over several days to
several weeks so that all of the internal leather fibers
are lubricated. Antique saddles are typically in my
studio for four to eight weeks. Every day or two
conditioners are applied and allowed to penetrate. There
are no set rules or guidelines for which conditioner to
use other than experience, knowledge of what has worked
on old leather in the past, and what the leather being
worked is telling you.
I do not
mean to discourage collectors from doing cleaning and
conditioning, but I do recommend that they get a thorough
professional job done first, and then take on the
maintenance of saddles in their collections. The cycle of
the conditioners reacting with the atmosphere continues
and leather will need periodic cleaning and conditioning.
How often depends on where you live and how you house
your collection. What you use will depends on the
recommendations of your restoration saddlemaker. If you
live in a hot humid and polluted area, an annual cleaning
and light conditioning my be appropriate. On the other
hand, if you live where the air is relatively clean, cool
and dry, dusting and a light conditioning may suffice for
several years. The best guide for frequency of cleaning
and conditioning is to look at and feel the leather in
question.
Finally,
never put lacquer (Neat-Lac, Saddle-Lac, Lac-Kote etc.)
on antique leathers. Lacquers produce a nice high gloss
finish, but conditioners will not penetrate through them
and laquers are extremely difficult to remove.
Case
Histories
The saddles I selected as case histories are not the
oldest or rarest that have made their way through my
studio, rather, they are examples of saddles that have
had a long way to come back to anything resembling their
original character. Hopefully, these case histories will
encourage collectors to consider the "bargain priced"
saddles at auctions, knowing that they can be resurrected
to a valued place in a collection.
The
first saddle was my client's prized possession
as a boy, but over the years he lost track of it. When he
found it outside of a relative's shed it was in pretty
sorry shape (Figure 3).
 Fig 3. Case history "Denver"
saddle
Fig 3. Case history "Denver"
saddle
The saddle
was built in the late 1940's to early 1950's and bore
only "Denver" as a maker's mark. It was stamped
with a "cabbage leaf" pattern which is fairly
common among floral carved production saddles of that
period. Obviously the saddle had greater sentimental
value than monetary value as a collectible. The leather
was very badly weathered from being exposed to the
elements, and the woolskin lining was shot. With the
exception of missing spots, buttons, strings and conchos,
all of the parts were there even though some were held on
with bailing wire.
The process
of restoring this saddle began with cleaning,
conditioning and pressing the curls out of the parts. At
that time, I had a student from Finland studying with me,
and at the beginning of each day over a period of a
month, his job was to work a light coat of conditioner
into the leather parts. The new woolskin lining was hand
sewn on the skirts, and the lacing on the swell welts was
replaced. New rigging leathers and straps were installed
because the saddle would be ridden by grandkids. The
saddle got new strings, and the missing spots, buttons
and conchos were replaced. A fresh black finish completed
the restoration work (Figure 4).
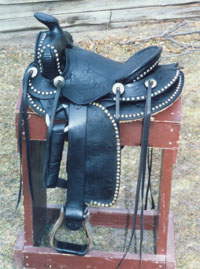 Fig 4. Restored "Denver"
saddle
Fig 4. Restored "Denver"
saddle
The
second saddle is 1930's Fred Mueller #610 saddle
that my clients discovered at a farm auction in eastern
Colorado.
 Fig 5. Case history Mueller #610
saddle
Fig 5. Case history Mueller #610
saddle
It is
similar to the #2765 R. T. Frazier saddle, and both are
built on the "Contest" tree. With its deep
seat, 2" cantle dish, and undercut swells , it was a
good rig for breaking horses. The tree did not become the
standard for competitive saddle bronc riding, but it is a
close cousin to the Tipton tree that is still popular in
ranch saddles. Earlier versions of this style of saddle
from the 1920's were built with eight buttons. These
saddles had small round skirts with a drop under the
rigging ring in the three quarters position. The rear
housings completely cover the skirts behind the cantle.
This saddle was unusual in that it had a rawhide cantle
binding and brand carved on the back of the cantle,
suggesting that it was originally made as a custom order.
The saddle
had seen a lot of use, and in its later years the cowboy
who owned it apparently didn't have the money to keep it
repaired. The woolskin lining was completely worn away
and the stirrup leathers were a hodge-podge of pieces
tied together with leather shoestrings. The leather parts
were dried out and curled, and the strings were in bad
condition.
Restoration
work on this saddle began with cleaning and conditioning.
The skirts were relined with hand sewn woolskin and new
strings were installed. New laced stirrup leathers were
built, and treads and wear leathers were put on the
stirrups. A new latigo and off billet put the saddle back
in a usable condition. The front binding on the swells
was worn through on the off side, but because the swells
were built with plug welts, it was decided that
attempting to make this repair would result in the welt
stitching breaking out and lead to more extensive work
than was justified.
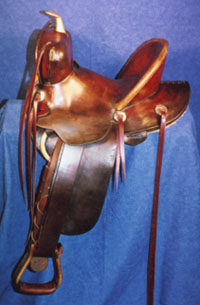 Fig 6. Restored Mueller #610 saddle
In my
opinion, the acid test of a successful restoration job is
this: if a saddle made in 1890 had been taken in for
repairs in 1900, does it look like it was repaired by a
1900 professional saddlemaker? Nothing looks worse or
detracts more from the value of a collectable saddle than
restoration and repair work that is poorly done or that
is inconsistent with the period of the saddle.
Figures
1. F. A. Meanea carved panel
2. R. Sherer carved panel
3. Case history "Denver" saddle
4. Restored "Denver" saddle
5. Case history Mueller #610 saddle
6. Restored Mueller #610 saddle
© Richard L. Sherer
Download the Bibliography List!
 77.0kb 77.0kb
Download the Restoration Article List!
28.5kb
|